Promotion


Flash Video MX Pro
Moyea Flash Video MX Pro, with the main function of video to Flash, SWF conversion, supports H.264, Flash 8 alpha video, F4V video encoding, CuePoint and basic video editing! It provides also vivid video effects, a preloader, and a Flash Player,etc

When you are surfing on the Internet, you would feel the pulse to publish some video clips, such as you DV video, on the web from time to time. The how to? With Flash video authoring tool, creating such a web compatible video and publish it is as easy as logging onto a website.
The traditional way to publish a video clip on the web is to prepare the video a number of times to please a wide range of audience, and then try to explain to them how to play back the video online. Some people like Real Player, some Windows Media, or QuickTime, etc., all of which do not have 100% market coverage. When you choose any one of the video format for your distribution, how can you make sure that your video can reach the largest audience for you cannot force the audience to use software they don’t like. This is where Flash comes into handy.
Flash Video MX Pro is a fine Flash encoder as well as FLV encoder and lets you convert your video files into streaming SWF and FLV, which is smaller in size than the conventional video formats, has control bar, playback settings, and thus convenient for you to share with other people online. This guide is to give you the instructions on how to convert video to SWF files and Flash video (FLV) using Moyea Flash Video MX.
Step 1, Import video file to the encoder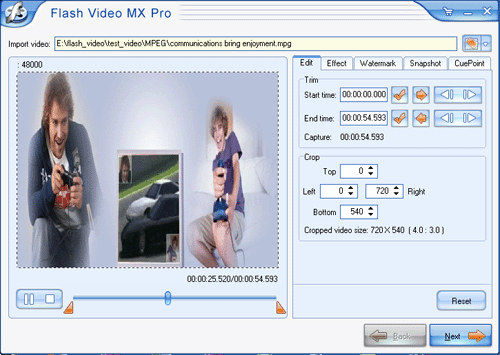
Clicking the folder button, you can import video file to the program. Moyea Flash Video MX supports MPEG, MPG, WMV, ASF, AVI, MOV, MP4, RM, 3GP, etc.
Tips: In this step, you can: 1) Trim the video duration, crop the video size under Edit tab; 2) Adjust video and audio effects under Effect tab; 3) Add image and text watermarks to the video; 4) capture one frame of the video as the thumbnail for the generated FLV or SWF files; 5) Add cue point to the video.
Step 2, File Settings to adjust the video and audio settings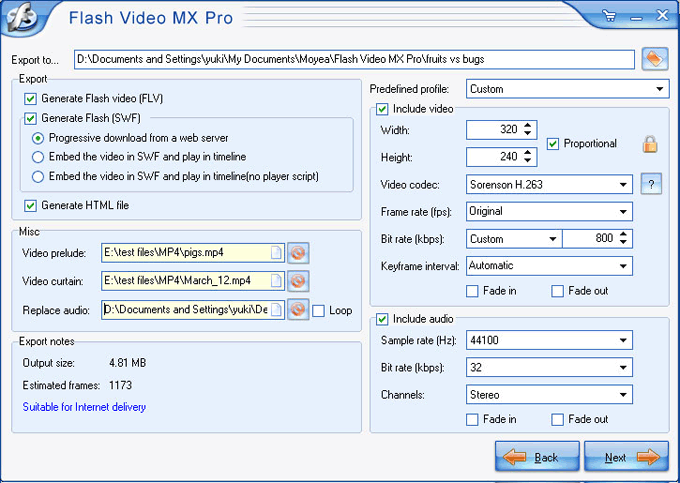
Click the Next button to go to the Export Settings. This step is designed to set the output folder and parameters of the video and audio data: video codec, frame size, frame rate, bit rate, sample rate, channels, fade in, fade out, etc.
Bitrate is the number of bits used per unit of time to represent a continuous medium such as audio or video after data compression
Frame rate is the measurement of how quickly an imaging device produces unique consecutive images called frames. Frame rate is most often expressed in FPS (Frame per Second).
Tips: In this step, you may: 1) replace the original audio of your file with another to meet your requirement; 2) add video before the start time and after the end time.
While selecting output format, you can follow introduction below:
Generate FLV file: Click this check box to generate FLV file with the settings you specified. If you uncheck this option, the option “Generate SWF file” is automatically checked.
Generate SWF file: There are three kinds of SWF files. When you check either of the first two ways of generating SWF file, you can add video effect in the next step. If you check the third way of generating SWF, you will be directed to the encode section directly.
Tips: To publish this FLV file along with an FLV player, you can check either of the two boxes of Generate SWF and HTML file.
Step 3, Player Settings
Click on the Next button to go to the Player settings section.
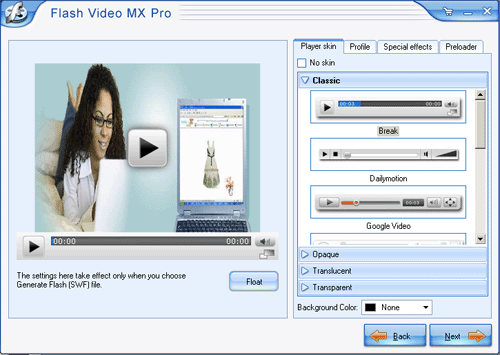
This step is most interesting. You can select player skin, preloader and also special effect. You can also set the player skin under Profile tab. Your output video will be unique.
Step 4, Convert and Publish
Click on the Next button and you will come to the Encode section. Here, you can see the parameters of the video. Click Start button to activate the encoding process. 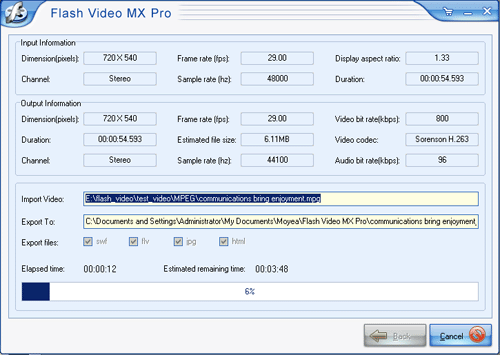
After the encoding, you can upload all generated files to the same folder of your server and you can stream the video online in the HTML file.
Tips
- MOV to FLV Encoder - Convert mov to flv with Flash Video MX
- How to convert mkv to avi with Moyea MKV Converter?
- Convert Flash Video FLV from YouTube to wmv for Cowon iAudio D2
- How to Pick a Best FLV Viewer
- Best Flash Video Downloader - Capture and save online video to PC
- Convert Flash Video FLV from YouTube to WMV for CMD V-85
- FLV to Cell Phone: Convert FLV(Flash Video) video to Cell Phone with Moyea FLV Converter for Cell Phone
- MKV to MP4 - Convert MKV to MP4 for iPad with the best iPad format
- FLV Player Help
- How to Convert FLV(Flash Video) video to PMC