Promotion


Pavtube FLV/F4V Converter
Pavtube CUDA FLV Converter now can convert all encoded FLV/F4V videos to other video formats like MOV, MP4, MKV, WMV, AVI, DVD, VCD, SVCD, FLV (Sorenson H.263), FLV (H.264), SWF etc with ease.

After downloading some interesting FLV videos from Hulu, YouTube, Google Video, MySpace or other video-sharing sites, you may want to convert FLV to MPEG, or convert FLV to MPEG4 for better enjoyment on your media devices.
Now the tutorial will show you how to convert FLV to MPEG4, convert FLV to MPEG (VCD, DVD Video), MPEG-1, and MPEG-2, etc. with a good FLV to MPEG Converter - Foxreal FLV Converter.
Step 1 Free download the Foxreal FLV to MPEG Converter, install and launch it

Step 2 Add FLV files into this FLV to MPEG Converter program
Click on the"Add" button on the tool bar to import your target FLV files into the program. With the preview window, you are able to preview the FLV file in the inserted player easily and freely.
Step 3 Choose the Output Settings
Click";Format" to choose your desired output format, such as MPEG, MPEG4, MPEG1, MPEG2, etc. as well as choose output folder from";Output" with ease.

In addition, if you want to join FLV files into a single one, or combine videos into a one, please check"Merge into one file" on the main interface.
Step 4 Edit video files
Under the"Edit" tab, you can crop and trim the video, adjust video effects, and add watermarks.
In the picture below, you can see the marked area for trimming a video. To add image watermark, you can check"Image watermark" ,"Enable"" and select an image by clicking"…". This step is particularly important for instructors or conference presenters to display their logo in the generated video. To add text watermark, you must"check"Enable" , then type in the words in the Caption box. You can change the font by clicking"…" button.

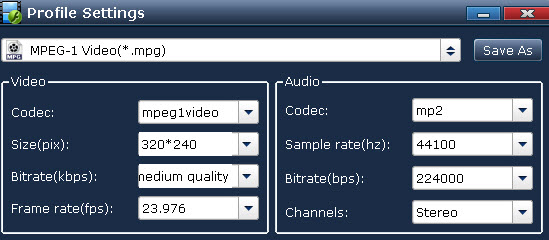
Step 5 Customize Output Settings
Click the";Settings" button, you can change video and audio settings like video codec, frame rate, bit rate, frame size, audio codec, sample rate, channels, and so on to best meet your needs in a simple way.
Step 6 Start FLV to MPEG conversion
Click";Convert" and";Start" to convert the files on the file list to the output folder with super high fast conversion speed and excellent output quality. By the way, batch conversion is also supported by the FLV to MPEG Converter.
Useful tips:
What is FLV?
FLV, or Flash Live Video file, is a preferred file format that is designed for web playback, offering high rates of compression to deliver video over the Internet using Adobe Flash Player.
FLV content cannot be played back directly but must be embedded in (or linked from) an SWF file. You create (or download) a";container" SWF file from which to play the FLV file. The most common approach is to use an SWF file that functions as a media player with screen and playback controls.
How to download Flash FLV video?
There is a free tool named Foxreal FLV downloader. It downloads video from YouTube, Google Video, MySpace, Metacafe, Dailymotion, iFilm, Music, eVideoShare, StreetFire, etc. off to your computer's hard drive in FLV format. By the way, you can use the powerful build-in video player to view it.
Tips
- AVCHD to BlackBerry Converter - Play AVCHD MTS file on BlackBerry PlayBook
- MKV to BlackBerry - Play MKV files on BlackBerry (BlackBerry PlayBook)
- Moyea Flash Video FLV Encoder & Decoder Solutions
- FLV to iPhone 4 - Convert FLV to iPhone 4 with Best FLV to iPhone 4 Converter
- How to rip Youtube Video FLV to WMA for Playback on Rio Carbon 6GB Player?
- FLV to Nokia E90: Convert FLV to 3GPP for playing on Nokia E90 with Moyea FLV to Video Converter
- Free Dailymotion Video Downloader - Capture and save videos from Dailymotion
- FLV to DivX AVI Converter - Convert YouTube FLV to DivX without quality
- How to convert FLV to DVD
- How to Convert Youtube Video FLV to WMV for Playback on your Creative Zen?