Promotion


FLV Editor Pro
FLV Editor Pro is the fantastic conversion tool for edit FLV. Along with the program, you can convert FLV to AVI, FLV to MPEG, FLV to MP4, FLV to WMV, FLV to MP3, et as well as edit FLV by its powerful editing functions.

Have you ever wanted to backup your local FLV or online FLV to DVD and enjoy with DVD player? There are many programs in market can do that. You have batches of choices as well. But which software is easiest and quickest solution to complete the conversion task? Moyea FLV Editor Pro helps you realize your idea along with powerful functions.
What are the advantages of FLV Editor Pro for converting FLV to DVD:
- 1. Both your FLV files on your PC or YouTube videos can be converted to DVD videos, which is ready for burning to DVD Disc. The program integrates FLV Downloader together. You can launch run FLV Downloader to get YouTube videos.
- 2. The program provides multiple DVD output options: DVD NTSC (4:3), DVD PAL (4:3), DVD NTSC (16:9) and DVD PAL (16:9). You can choose from them to meet your need.
- 3. You can edit FLV files in edit station to merge, trim and crop video, add watermark, insert special effects, output FLV and capture thumbnail. Do editing for your requirement.
How to convert FLV to DVD:
The following content is the tutorial for you about how to use the FLV video converter in detailed steps.
- Install this FLV to DVD converter and launch it. The main interface will pop up.
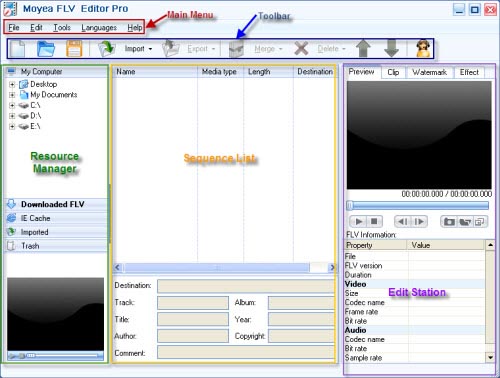
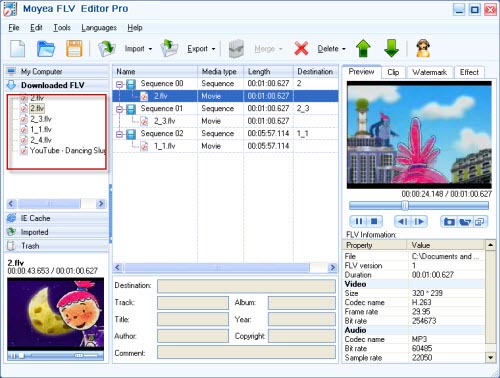
2. Import FLV into the sequence list.
Drag and drop FLV from resource manager to the sequence list or hit “Import” to load FLV files. If FLV Downloader is launched from “Tools” on main menu, the downloaded FLV from YouTube will appear in “Downloaded FLV” tab. You can drag it directly.
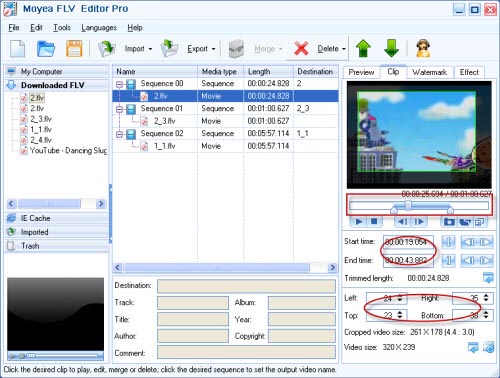
3. Edit video clips.
Clip
In edit station, you can click “Clip” tab to trim and crop the video. Type in the value in edit box to get precious trimmed and cropped clip. Or drag the slide bar to obtain fitable video length and adjust the green line on the screen to cut off the black edges.
Watermark
Click “Watermark” tab to add text watermark or image watermark. Click “+” button to choose watermark type.
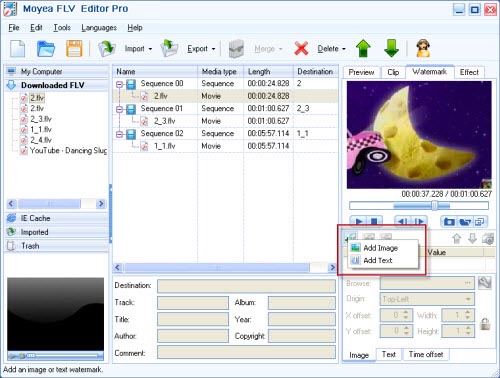
Image watermark:
Click “Browse” button to import the image into the video. Drag and drop the logo to set the position. Put the mouse on the green line or configure the value in edit box to resize the image. You can click preview with the float window for convenient use.
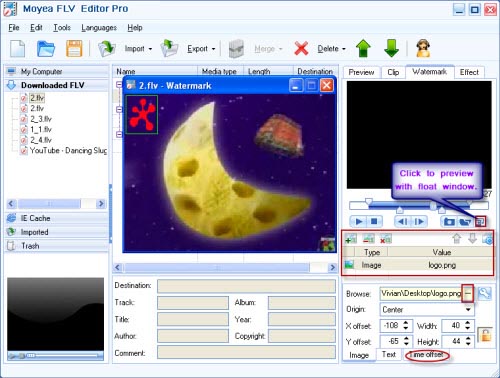
Hit “Time offset” tab at the bottom of edit station to set the duration of the video playback. If you want the transparency of the background, just click the wrench icon to realize the effects.
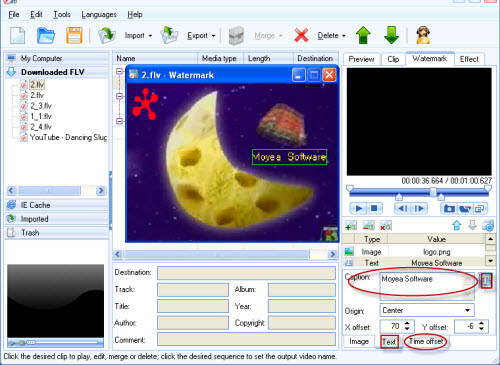
Text watermark:
Click “+” icon and choose “Add Text”. Type in the words as the text watermark into “Caption” box. By dragging the green line, you can move it and specify the position. Hit “T” icon to reset the settings like font, size and so on. Same as adding logo, you are able to set the lasting time of text watermark.
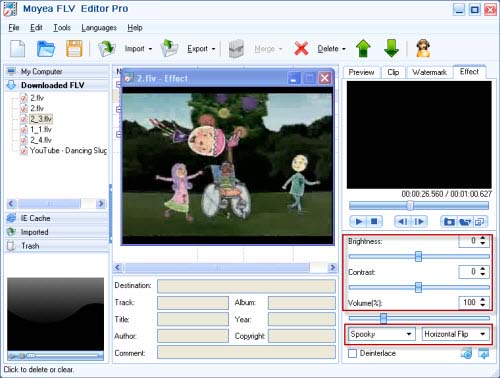
Effect
Click “Effect” to configure the brightness, contrast and the volume, especially you can choose the flip method and the special effects like spooky, emboss, engrave, etc.
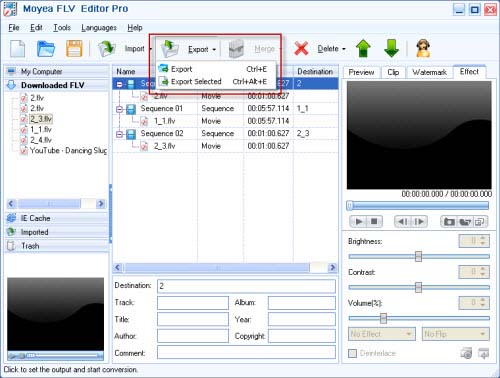
4. Export the sequence and convert.
Click “Export” for output. Select “Export” for all the sequences and select “Export Selected” for the selected sequence output.
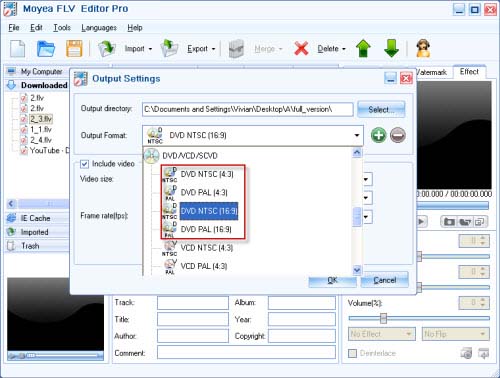
After choosing the output method, the output setting window will pop up. Choose “DVD NTSC (16:9)” as the output format and specify the output folder to save the converted files.
Then click “OK” to starting converting.
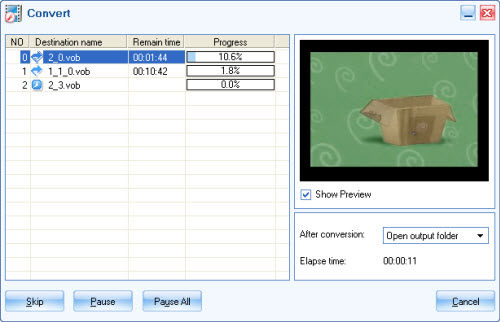
Now everything is ready for playing on DVD player or burning to DVD Disc!
Tips
- Refreshing experience of playing back FLV files with Moyea FLV Player
- M2TS to BlackBerry Torch 9800 - Convert M2TS files to BlackBerry Torch
- MKV to HTC Desire HD - Convert MKV files to HTC Desire HD for Playback
- FLV Software tools, free FLV Downloader, free FLV Player, FLV Converter, FLV Encoder
- Download YouTube FLV for free with Free YouTube FLV Downloader
- Free NBA Video Downloader - Download any online NBA video highlight
- Convert Flash Video FLV from YouTube to 3GPP for Sony Ericsson
- Open Source about FLV Player
- AVCHD videos playback&New Apple iPod Touch - You will forget it is an iPod
- AVCHD to YouTube - Upload AVCHD videos on YouTube for sharing