Promotion


Pavtube FLV/F4V Converter
Pavtube CUDA FLV Converter now can convert all encoded FLV/F4V videos to other video formats like MOV, MP4, MKV, WMV, AVI, DVD, VCD, SVCD, FLV (Sorenson H.263), FLV (H.264), SWF etc with ease.

Have you thought of converting FLV to MP4 for playback on your portable devices, like iPad, iPhone 4, iPhone 3G, iPod, Motorola Droid X, Sumsung Fascinate, HTC Droid Incredible, iPod Nano, iPod Touch, BlackBerry, Creative Zen, Zune, etc.?
Do not worry. This tutorial will show you how to convert FLV to MP4 with Moyea FLV to Video Converter Pro 2 for enjoyment on your iPad, iPhone 4, iPhone 3G, HTC Ariod or other mobile devices in a simple way.
Are you ready? Here we go.
Free download the Pavtube FLV to Video Converter here, install and run it. The main interface of the FLV to MP4 Converter will pop up as below:
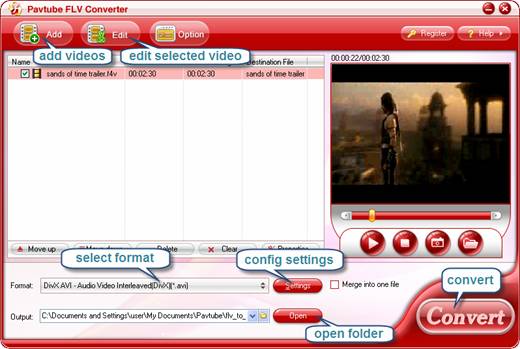
Add File
Click the "Add" button on the tool bar to import your target FLV files into the program. Batch conversion is also supported, so you are able to input as many FLV files as you like. After loaded, you can preview the FLV in the preview screen.
Clip the FLV Video and Add Watermarks
Click "Edit" to enter the editor window. You can select a specific file and then crop the FLV video to determine what area of the video image is to be shown. Moreover, you are allowed to trim the length of the FLV video, as is marked in the picture below.
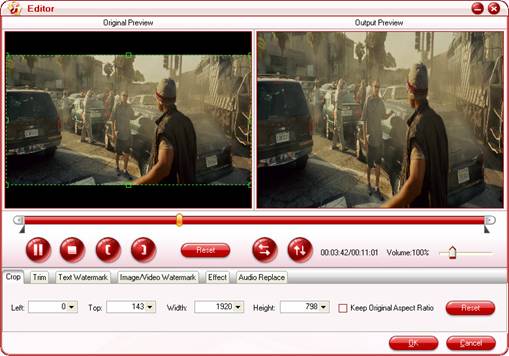
This FLV to MP4 Converter also supports adding image, video and text watermarks to the FLV video. This function is particularly useful for instructors and conference presenters to display their logo in the generated video.
Click "Add image/video watermark". Then you are able to choose your logo. Tick "Enable" to activate the function and then click "", you can set the location of the watermark. Or you can click "Add text watermark" and "Enable" to write text in the blank pane. What' s more, it is allowed you to set the font of the text by clicking "" button. Besides adjusting the brightness, contrast, saturation of the video, you can also select special effect from the drop-down list of "Effect" for your reference.
Change the Output Settings
You can change the output path by clicking the folder icon right behind "Output" box.
Select "MP4" in the "Format", and then you can change the video and audio settings with "Settings" tab. If it is not in need, just keep it by default.
Start FLV to MP4 Conversion
After all the settings, click "Convert" and "Start" to convert the FLV to MP4 Conversion. At the same time, you can view the detailed conversion inforamtion about converting FLV to MP4, like Time elapsed, Time left, Generated size and Estimated size. Or if you like, you can choose the option "Shut down computer after conversion".
Once the whole FLV to MP4 Conversion is done, you can transfer the generaed MP4 files to your iPad, iPhone 4, iPhone 3G, HTC Ariod, Black Berry or the like and enjoy them anytime anywhere with ease.
Useful tips about FLV and MP4:
What is FLV?
FLV, or Flash Live Video file, is a preferred file format that is designed for web playback, offering high rates of compression to deliver video over the Internet using Adobe Flash Player.
FLV content cannot be played back directly. It must be embedded in (or linked from) an SWF file. You create (or download) a "container" SWF file from which to play the FLV file. The most common approach is to use an SWF file to function as a media player with screen and playback controls. Notable users of the FLV format include Hulu, YouTube, Google Video, Reuters.com, Yahoo! Video and MySpace.
What is MP4?
A video compression standard planned for late 1998. MPEG-4 extends the earlier MPEG-1 and MPEG-2 algorithms with synthesis of speech and video, fractal compression, computer visualisation and artificial intelligence-based image processing techniques.
MPEG.ORG is an excellent source for additional information on MPEG format and usage.
Tips
- M2TS to BlackBerry Torch 9800 - Convert M2TS files to BlackBerry Torch
- FLV to Nokia N95 - Convert FLV to 3GPP for playing on Nokia N95 Smartphone
- Convert FLV to AVI with XviD video code video with half of its sizec to enjoy a DVD quality
- VP6 Flash Video Converter - Convert VP6 to WMV
- How to Play FLV with your browser
- How to Edit FLV with FLV Converter?
- How to convert MTS to AVI without quality loss?
- Get 1080p Videos onto iPad for Playback - 1080p to 720p Converter for iPad
- How to Convert Youtube Video FLV to MP3 for Playback on i-Mate SPJAS Mobile Phone?
- Convert Flash Video FLV from YouTube to wmv for IUBI S60