 Promotion


FLV Editor Pro
FLV Editor Pro is the fantastic conversion tool for edit FLV. Along with the program, you can convert FLV to AVI, FLV to MPEG, FLV to MP4, FLV to WMV, FLV to MP3, et as well as edit FLV by its powerful editing functions.

As we all know that Adobe has released Acrobat 9 with the function of embedding FLV files to PDF. This is said to have some very important ramifications for Internet Marketers. But as I say, it also brings convenience to business users. Now the business users are able to add Flash videos to the boring text documents without difficulties. Besides they are able to have business presentations, and make large files in PDF portfolios with Acrobat 9. It is also easy to add video files to like 3g2, .3gp, .3gpp, .asf, .avi, etc. to the PDF. The video files will be converted into FLV and embedded. But what if you are using the previous Acrobat products? Can you add Flash videos to the PDF as well?
If you are using Acrobat 6 or above, I’d like to say, Yes. In the previous versions before Acrobat 9, you are able to embed QuickTime video and other formats into a PDF file. The only tool you need is a FLV tool to convert the Flash videos to these formats. As long as the end computer has the relative players installed, the video file will be played smoothly in the PDF file. FLV Editor Pro is right one of the FLV tools you need. It helps convert FLV to popular video formats that are compatible with Apple QuickTime, Windows Build-In Player, RealOne, and Windows Media Player that is supported by Acrobat 6 and above, such as .wmv, .mpeg, .avi, .rm, .asf, etc.
This tutorial is to tell you how to convert the FLV files to formats supported by Acrobat 6 or above (.wmv, .mpeg, avi, .rm, etc.).
First of all, lets see what we can do to the Flash videos.
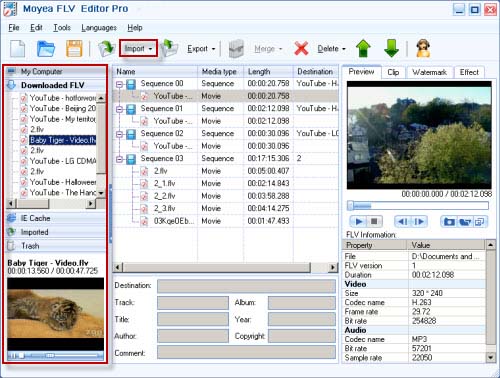
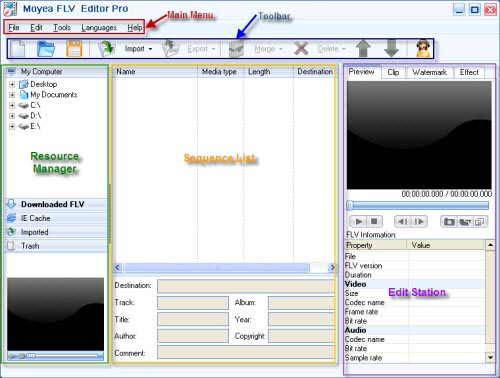
Install and run the FLV Editor Pro. The following interface will show up.

Import the FLV files
You have several choices to import the FLV files: by clicking File> Import>; by clicking the Import button on the Toolbar; or by dragging from the Resource Manager. This program supports batch encoding. You can select multiple FLV files at one time with the first two ways. If choosing Import, the FLV files will be imported as separated sequences. If choosing Import Merge Files, the FLV files will be imported as a single sequence and be exported as a single video. The videos will be combined in order.
By double clicking on an FLV file in the Resource Manager, you can preview the video on the left preview pane.
Video Editing
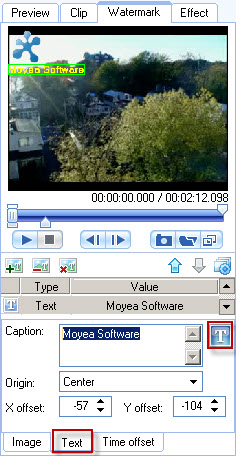
This converter also provides powerful editing functions. You are able to add watermarks, trim and crop the videos, and add special effects. Thus you can add your company logo or copyright notifications to the video as the following picture. Just select the Watermark tab, and click the + button to add image and text watermark. You can place the watermarks anywhere on the video at any time. With the T button of Text tab, you can set the font. With the ![]() button of Image tab, you can set transparent color and alpha for the image.
button of Image tab, you can set transparent color and alpha for the image.
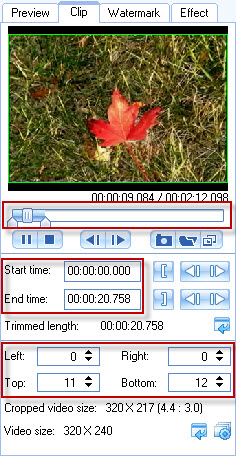
If you are not satisfied with the video size and length, you can also crop and trim the video under Clip tab. Just drag the slide bar under the preview window to trim and resize the green frame to crop. Or you can change the values in the red marked boxes of the following picture and press Enter on the keyboard to confirm. If there are multiple videos in the same sequence, you can export them into one big file without the unwanted parts.
Under the Effect tab, you are able to adjust contrast, brightness, and volume. You can also add special effects like purple, emboss, spooky, etc.
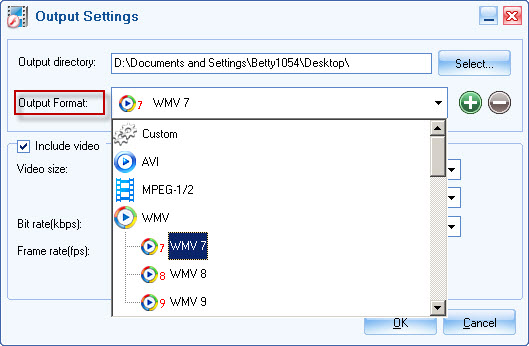
After the settings, you can select a sequence on the sequence list and click the Export button on the tool bar. If you select Export, all the sequences on the list will be converted. If you want to convert some of the sequences, just select the specific sequences with the help of Ctrl and select Export Selected. In the Output Settings window, expand WMV in the Output Format menu and select one of the .wmv types.
Then click OK to go to the Convert window. You can see the process of the conversion on the right preview pane and select what to do after the conversion. And then you get the FLV converted to WMV which is accessible to Acrobat 6 or above. Here we take Adobe Acrobat 7 Professional as an example.
How to embed the .wmv file into Acrobat 7 Professional?
First, open the PDF file that youd like to embed the video.
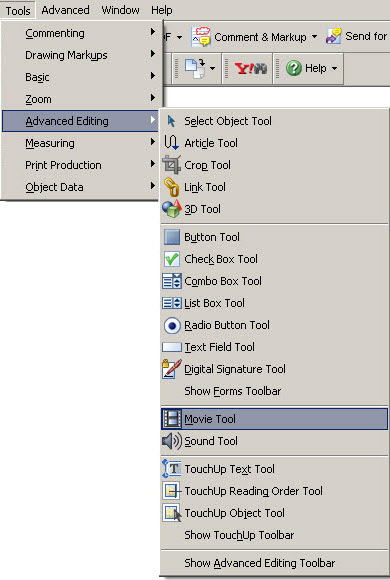
- Choose Tools> Advanced Editing> Movie Tool.
- Drag or double-click to select the area on the page where you want the movie to appear. The play area is the exact size of the movie frame (if Acrobat can read the media clips dimensions). The Add Movie dialog box appears.
- Select Acrobat 6 Compatible Media if you want access to all movie options, or select Acrobat 5 (And Earlier) Compatible Media if you want your media clip to be available t users who have not yet upgraded from version 5.0 or earlier of Acrobat or Acrobat Reader.
Note: To embed media clips, assign different renditions, create a poster from a separate file, and specify the content type, you must select Acrobat 6 Compatible Media. These options are not available when you select the Acrobat 5 Compatible Media option.
- To specify the movie clip, type the path or URL address in the Location box, or click Browse and double-click the movie file.
- For Acrobat 6.0-compatibel movie clips, do the following:
- Specify the content type to let Acrobat know which media player to use. In general, you should use the content type selected by default. Specifying the wrong content type may cause difficulties during playback.
- Select Embed Content In Document if you want the movie file to be included in the PDF document. IF you deselect this option, the document includes only a link to the external movie file. If you dont embed the file, make sure that you use the correct file name and relative path location for the movie clip when you distribute the PDF document.
- Select Snap To Content Proportions to maintain the movies original size when it plays.
- To select a movie poster, which determines the appearance of the play area when the movie isnt playing, do one of the following, and then click OK;
- Select Use No Poster to leave the background of the movies play area invisible.
- Select Retrieve Poster From Movie to Show the first frame in the clip as a still image when the movie is not playing.
- Select Create Poster From File To select a different image to use as the poster. Click Browse, and then double-click the file.
From Adobe help document
Select the hand tool on the tool bar and click on the video, you can play it without difficulty.
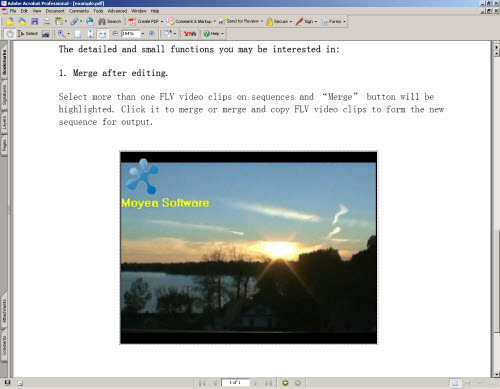
Thus you can play the video in your PDF. A vivid document makes your boring work interesting. According to this file, as long as the end computer has Windows Media Player installed, the video is able to be played in this PDF.
Tips
- F4V to AVI - Convert F4V to AVI without quality loss
- AVI to FLV Converter Offers Solutions to Create Flash Video FLV from AVI file
- Moyea Flash Video FLV Encoder & Decoder Solutions
- Best Veoh Video Downloader - Download and convert Veoh online videos to iPad
- FLV to WMV - Convert FLV to WMV (Windows Media Video)
- How to use FLV Editor Pro quickly and skillfully
- Free Dailymotion Video Downloader - Capture and save videos from Dailymotion
- Best HTC Desire HD Video Converter - Play videos on HTC Desire HD
- How to Play FLV files Online with Moyea Flash Video MX
- Best BlackBerry Torch Video Converter - Convert Video to BlackBerry Torch 9800

