Promotion


Pavtube FLV/F4V Converter
Pavtube CUDA FLV Converter now can convert all encoded FLV/F4V videos to other video formats like MOV, MP4, MKV, WMV, AVI, DVD, VCD, SVCD, FLV (Sorenson H.263), FLV (H.264), SWF etc with ease.

Have tons of FLV videos and want to watch these Flash videos on your PC or other portable media players? To convert FLV to WMV (Windows Media Video) must be your perfect choice. Since Windows Media Video (WMV) is a type of video which can be played on your computer and other portable media player. What's more, the WMV format allows to compress large video files with rich video quality.
However, how to realize it? Do not worry. This tutorial will tell you how to convert FLV to WMV with Foxreal FLV Converter. In order to complete this guide, please first install the CUDA FLV to WMV Converter here.
PS: Foxreal FLV Converter offers good solutions to convert FLV files downloaded from video sharing sites to WMV file format playable on the PC and other portable devices. To use this program to convert Flash Video files to WMV, you don't have to install additional plug-ins or other codecs. In other words, with the converter, you can just sit back and enjoy. Step-by-step guide to convert FLV to WMV as below:
1. Launch Foxreal FLV Converter. The main interface will show as below:

2. Add and edit the FLV files
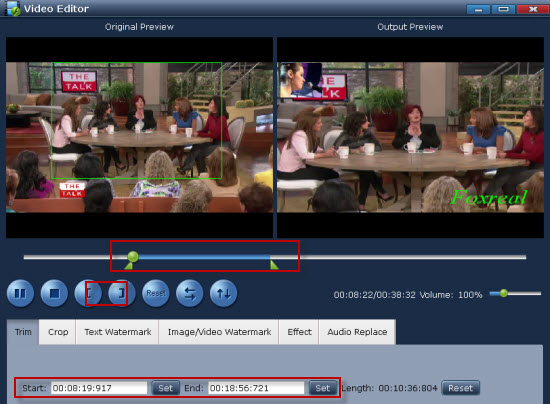
Principally, Foxreal FLV Converter supports conversion in the batch mode and you can add multiple files for conversion each time. Once the target FLV files are imported into the program, you can preview them in the preview panel of the interface. After importing FLV files, you can edit them by clicking "Edit". Trim the video and get the video length you like and cut off the black edges by cropping:
Add logo and text watermark
After adding the logo, you can specify the logo position by configuring values of "Left" and "Top". If you want to adjust the logo size, you can change values of "Width" and "Height".

Adjust video effects in "Effect" such as brightness, contrast, saturation and the volume.

3. Select the output format, output path and change the audio and video settings
Choose WMV as the output format in the pull-down menu of "Format" and select where to save your converted files on your PC by clicking "Output". Hit "Settings" icon and configure the settings including the codec, bit rate, frame rate, etc. If you just want audio, you can extract it by only checking "Common Audio In Output File". Then it will be done.

4. Start conversion
Click "Convert" and hit "Start" icon. It will begin encoding WMV file. After C0UDA FLV to WMV conversion, you can find the output files in the target folder that you specified on your PC. OK, now WMV files are ready for you!
Tip:
What is WMV?
WMV, as a video file format, stands for Windows Media Video. It was developed and controlled by Microsoft. WMV is a generic name of Microsoft's video encoding solutions and doesn't necessarily define the technology that it uses. Since WMV7, Microsoft has used its own flavor of MPEG-4 video encoding technology. DivX video format is originally based on the WMV codec.
Tips
- Enjoy Flash Video FLV from YouTube and Google Video on your CDMA cell phones
- MKV to iPhone 4 - Convert MKV to iPhone 4 with Best MKV to iPhone 4 Converter
- VP6 Flash Video Converter - Convert VP6 to WMV
- Best BlackBerry Torch Video Converter - Convert Video to BlackBerry Torch 9800
- How to Play FLV with your browser
- How to Convert MKV to iPad *.mp4 for Enjoyment?
- How to extract audio from F4V?
- FLV to DS : Convert FLV to DS with Moyea FLV to Video Converter
- How to Convert Youtube Video FLV to WMV for Playback on your Samsung YEPP YH-999 PMC?
- How to create FLV Player playlist?