Flash Video MX Pro
Moyea Flash Video MX Pro, with the main function of video to Flash, SWF conversion, supports H.264, Flash 8 alpha video, F4V video encoding, CuePoint and basic video editing! It provides also vivid video effects, a preloader, and a Flash Player,etcIt is now quite popular to upload your favorite Flash videos to the web to share with others. Yet you will feel from time to time that the whole piece of video is not what you want, and thus want to trim the unwanted away and retain your favorite video clips for online distribution. Now there is some software to meet such needs, and that is Flash Video MX.
Here I would like to share with you my experience of using the format conversion software, particularly to newbies. Hopefully this guide will be of help to you. Flash Video MX is a Flash video encoder and is empowered with the trim and crop functions, and thus you can make customized Flash video for different needs. Some part of the video clip may be of use to you, while others are useless for online sharing, this is where the trim & crop function come in handy.
Note: To finish this guide, you’d have to have the program Moyea Flash Video MX. To install the trial version of the program, you can go to the official site /video_to_flv/
Step 1, Load video file
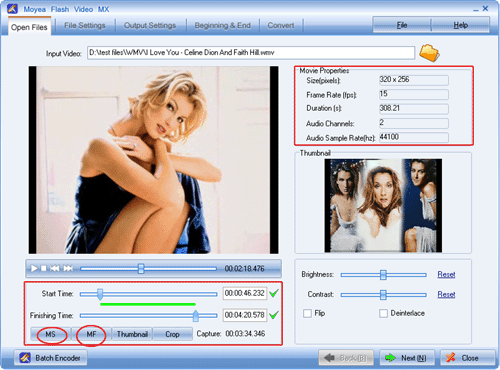
Click on the “Open” graphic icon at the end of the “Input Video” box to load video into the program. Like the screenshot show below, the video movie will be played back automatically by default when it is fully loaded.

Step 2, Trim video
You can click on the two buttons “MS” and “MF” to trim the video while it is playing in the preview panel. Alternatively, you can drag the bar on “Start Time” and on “Finishing Time” to trim away those unwanted video clips.
Tips:
1), For reference, you can refer to the section of Movie Properties to view the original information of the source video to change the video to proper settings.
2), Click on the Thumbnail button and you can generate a thumbnail image for the output Flash video. And you can view the thumbnail image the right section of the interface. Double-clicking the image can pop up a window for you to adjust the settings for the thumbnail.
Step 3, Crop video
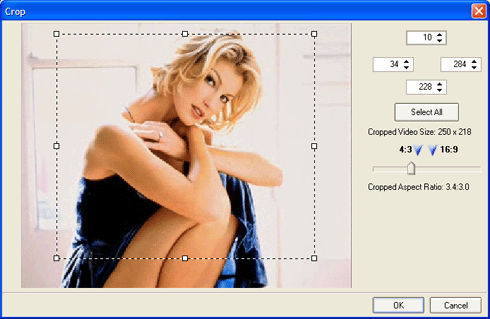
Click the Crop button and you will pop up the following window for you to crop away the unwanted areas of the video. You can directly drag the dotted frame manually to crop the video.
Step 4, Output settings
This program is designed mainly to help us convert the source video formats to SWF and FLV for online distribution. If you aim is to merely create the SWF and FLV files, just click on the “Next” button on and on, and then click on “Convert”. If you want to create some advanced SWF and FLV files, you can adjust the settings in the steps of “File Settings”, “Output Settings”, “Beginning & End”.
Tips
- How to Save FLV Files onto DVD?
- FLV to CD - Convert FLV to CD for Playback with FLV to CD Converter
- How to Convert MKV to iPad *.mp4 for Enjoyment?
- How to Extract Audio from FLV Video to MP3 audio?
- FLV Converter for Mac and Microsoft Windows
- FLV to Nokia N95 - Convert FLV to 3GPP for playing on Nokia N95 Smartphone
- How to convert video to Flash (swf) and Flash video (flv)?
- How to Extract Audio from FLV Video to MP3 audio
- How to Convert FLV to WMV for Sony Vegas?
- How to trim and crop video clips to create your favorite Flash video
 Promotion


