Promotion


Flash Video MX Pro
Moyea Flash Video MX Pro, with the main function of video to Flash, SWF conversion, supports H.264, Flash 8 alpha video, F4V video encoding, CuePoint and basic video editing! It provides also vivid video effects, a preloader, and a Flash Player,etc

Three steps tell you how to make a video-based Flash, Flash Video! Do just what YouTube.com do on your company homepage, personal homepage, or blog!
Code is offered for embedding the SWF to an HTML file at the very end.
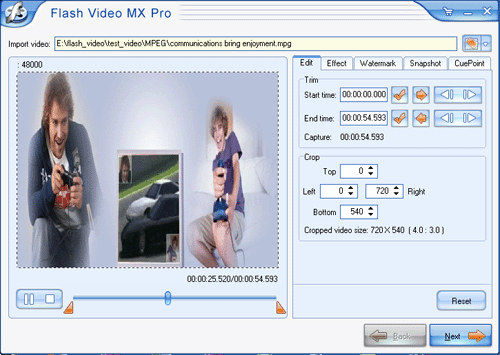
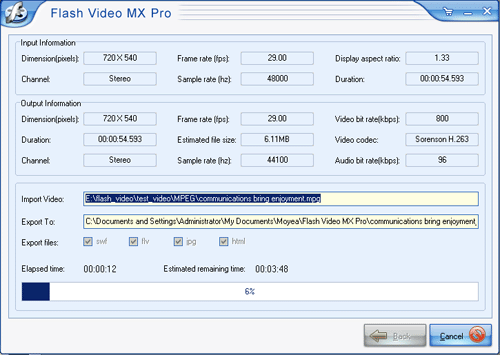
Step1. Input video
Click the folder, and import your video.
Tips:
1. Trim a movie region to convert by dragging the Start and Finishing Time bar.
2. Deinterlace to avoid the artifact, degradation of my DVD video.
3. Thumbnail for the first frame.
4. Video crop for a preferred dimension.
Step2. File settings
Set the audio & video parameters.
Coincidence:
1. Add video before and behind the source file for an entire Flash, Flash video.
2. Totally erase the original audio and replace with my favorite music.
3. Video Codec is selective, Flash 8 and H.264 is on choice as well.
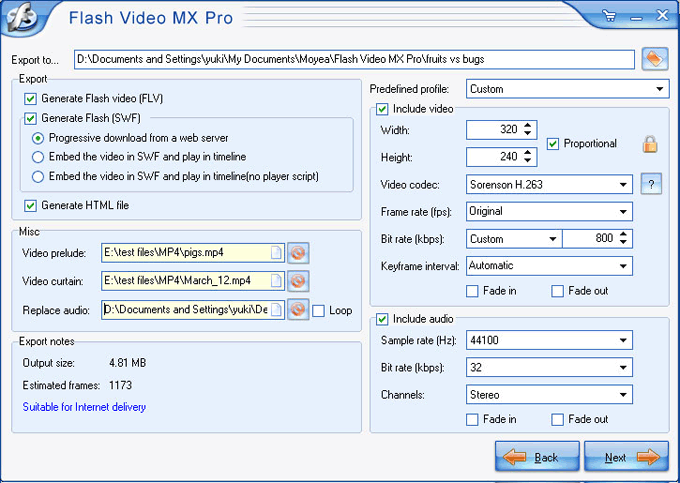
Step3. Output Settings
a. Export settings.
Tips: Do check the boxes of “Generate FLV file”, “Generate HTML file”, if you want an HTML file.
b. Player settings
This is the most amazing! Preview in a What-you-see-is-what-you-get way.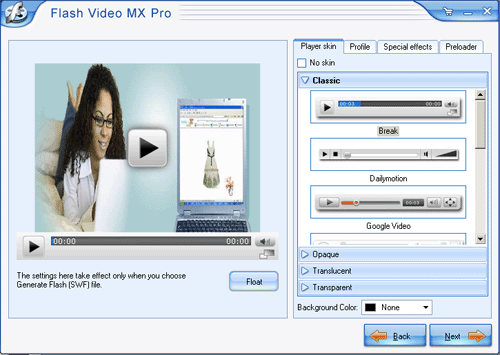
Three parts here for the above image, Left: Control Bar, Middle: Detail settings, Right: instructions for each item in the middle.
Left: Control bar: Up to 17 attractive control bar skins
.
Middle: Detail settings & Right: instructions for each item in the middle.
①Player position, Panel color, Hide button, big play button, Reply setting, pause frame, scale, are to let you be a movie maker.
② video link URL, video end URL automatic accessing, load mode, player extend, Play URL, etc will help a lot for HTML file.
③Clear instructions for each item you go in the middle
. 
Step4. Convert
Click “Start” to convert, then you just follow below steps to hel
Then, how to embed SWF file into an HTML page?
You can code the page like the following:
shockwave/cabs/flash/swflash.cab#version=7,0,0,0″ width=“400” height=”300“>
mflvplayer.swf?playerOpts=targetClip*demo.flv*s”>
ownload/index.cgi?P1_Prod_Version=ShockwaveFlash” type=”application/x-shockwave-flash” width=”400″ height=”300″>
–>
–>
Well, have you noticed the mflvplayer.swf in blue?
The width=”400″ height=”300″ in black indicates the width and the height of your video.
The playerOpts=targetClip*demo.flv*s in bold indicates the name of the FLV file to be played while demo.flv is your video. You might be curious about targetClip, the asterisk separator and the “s” in the end.
In fact, playerOpts is not that simple. PlayerOpts consists of several segments, each of which is separated by “||”, and each segment contains a property of the control bar. One segment is divided into 3 parts by the asterisk (*). The first part is the property name, the second part is the property value and the third part is the data type of the property. For instance,
targetClip*demo.flv*s is a segment, targetClip is the property name, demo.flv is the property value and the “s” is the character string type of this property. This segment is to specify the path from which the control bar can play the video. There are also other properties. You can set multiple properties at a time, using “||” to separate different segments, code like the following:
playerOpts=targetClip*demo.flv*s||panelColor*255,0,0*c
In this way, when you are setting the targetClip property, you are also setting the panel color property. The panel color is the control bar color, the data type is color “c”, and 255,0,0 is the RGB color. Please notice that the property name and data type are case sensitive.
Tips
- Choose the Right Tool to Record Flash Video Online
- How to rip Youtube Video FLV to mp3 for Playback on Zen Neeon 2 MP3 player?
- F4V to AVI - Convert F4V to AVI without quality loss
- Open Source about FLV Player
- Get 1080p Videos onto iPad for Playback - 1080p to 720p Converter for iPad
- Flash Video Converter - Make Flash SWF, Flash Video file with Flash Video MX Pro
- How to Create a Project File for Editing FLV Later?
- FLV Cue Point Control with Flash Video MX Batch Encoder
- How to convert M2TS to AVI on PC?
- Save Flash Video from Website free onto your computer