Promotion


Pavtube FLV/F4V Converter
Pavtube CUDA FLV Converter now can convert all encoded FLV/F4V videos to other video formats like MOV, MP4, MKV, WMV, AVI, DVD, VCD, SVCD, FLV (Sorenson H.263), FLV (H.264), SWF etc with ease.

You probably need to edit them after getting the material video sources from YouTube or other video-sharing web sites. To make the DIY video of your own, it is necessary to add to the special mark, ensuring the viewers know the source. Moyea FLV to Video Converter Pro 2 allows you to add image and text watermark. It is an excellent way to stamp or highlight the video such as your company name, date of creation, company logo, etc.
The process of watermarking the video is really simple with FLV to Video Converter Pro 2. With it, you can create a unique watermark to brand your creations. You can import FLV, add the watermark and also output FLV encoded with H.263. You still can get FLV files if you do not want other video formats like AVI, MPEG, MP4, WMV, MOV, 3GP, etc. That is special point for this program compared with other similar FLV converters.
The following steps to tell you how to add watermark:
- Pick up a picture as the logo.
You can pick a picture or image you like as the watermark to save on your PC. Make sure that the image format is support by FLV to Video Converter Pro 2. Generally JPG, PNG and GIF are compatible with this program. If wanting better picture quality, you can choose PNG format. For the smaller size, JPG is the best choice. As for GIF, that is suitable for the animated picture.
- Install and run the software and the main interface will pop up.
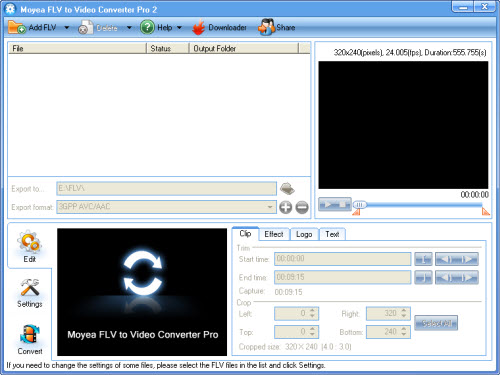
Input FLV files into the program via clicking “Add FLV” icon.
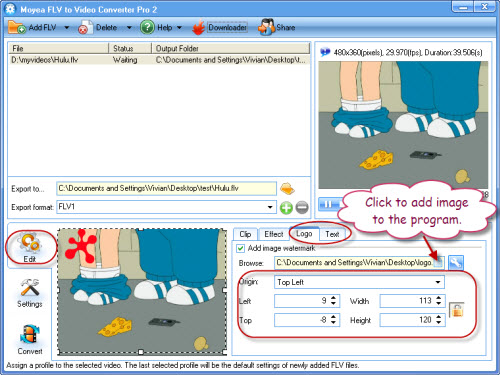
- Add an image to the video.
In “Edit” box, you can see “Logo” tab where to add the watermark. At first, check the option “Add image watermark”. Then click the text icon to import the image and put it in the video.
Tips:
- Choose the approximate position by selecting in “Origin” box.
- Adjust the precise location of image in “Left” and “Top” box and resize the image in “Width” and “Height”.
- By default, the lock icon is pressed, indicating that it keeps the original aspect ratio. You can click it to make it not keeping the aspect ratio.
- Click the wrench to enable the function to set the transparent color.
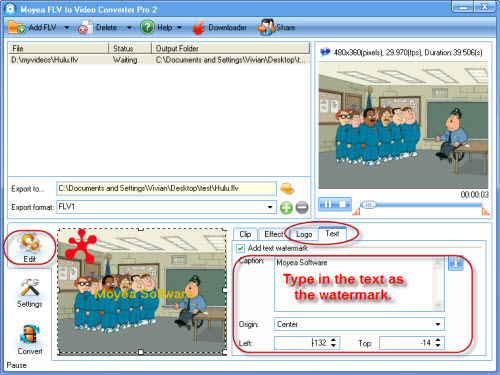
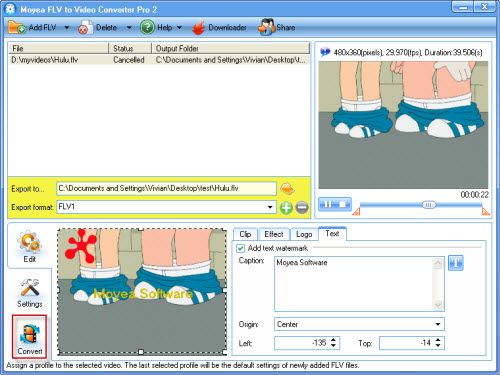
- Add a text watermark to the video.
Click “Text” tab to set the text watermark. At first the same to add image watermark, check the option “Add text watermark”. Then type in the words you want as the watermark. You can real-time see the final effects in the left preview box.
Tips:
- Click “T” icon to set the font effects including Font, Style, Size, Color, etc.
- Choose the approximate position by selecting in “Origin” box.
- Adjust the precise location of the text in “Left” and “Top” box.
- Set the output settings.
Click the folder icon to make sure where to put the output files and choose the output format in “Export format” box. You can select to export FLV files or other video formats like AVI, MPEG, WMV, MOV, MP4, 3GP and more.
- Begin output.
Click the “Convert” tab and hit “Start” button to begin output the video with the image and text watermark.
You can find the output files in the specified folder. It just needs a few clicks to add watermark to the video. Do not hesitate. Come on and have a try.
Tips
- Convert FLV to AVI video with DIVX codec to author a desired video with your favorite FLV movie!
- Convert AVCHD to Samsung Galaxy S for playback with best M2TS/MTS Converter
- FLV to PSP - Enjoy Flash Video FLV from YouTube and Google Video on your PSP
- FLV to Nokia E90: Convert FLV to 3GPP for playing on Nokia E90 with Moyea FLV to Video Converter
- Convert Video from FLV(Flash Video) to AAC(iTunes Audio) with FLV to Video Converter
- How to Convert FLV to MP4 for Playback on iPod?
- How to Convert FLV to DVD with Pavtubel FLV to Video Converter Pro
- FLV to AVI - Convert FLV to AVI on windows media player
- FLV to AVI - Convert FLV to AVI video for BlackBerry
- How to Convert FLV to MP4 for Playback on iPod?