Promotion


Pavtube FLV/F4V Converter
Pavtube CUDA FLV Converter now can convert all encoded FLV/F4V videos to other video formats like MOV, MP4, MKV, WMV, AVI, DVD, VCD, SVCD, FLV (Sorenson H.263), FLV (H.264), SWF etc with ease.

FLV to Zen Vision (Creative Portable Media Players - ZEN Vision W and ZEN Vision)
This tutorial is to show you a step-by-step demonstration of converting videos downloaded from YouTube and Google Video, etc., and enjoying them on your Creative Zen Vision. First of all, we have to make it clear that the YouTube videos and Google videos communicating online are Flash Video file, or FLV file format.
What is FLV?
FLV, or Flash Live Video file, is a preferred file format that is designed for web playback, offering high rates of compression to deliver video over the Internet using Adobe Flash Player.
FLV content cannot be played back directly but must be embedded in (or linked from) an SWF file. You create (or download) a “container” SWF file from which to play the FLV file. The most common approach is to use an SWF file that functions as a media player with screen and playback controls. Notable users of the FLV format include YouTube, Google Video, Reuters.com, Yahoo! Video and MySpace. You can download videos with FLV Downloader. It downloads any streaming video from YouTube, Google Video, MySpace, Metacafe, Dailymotion, iFilm, Music, eVideoShare, StreetFire, etc. off to your computer’s hard drive for free.
What is Zen Vision?
You can view for more info from its official website
http://www.creative.com/products/pmp/
Or Google search it.
Launch Moyea FLV to Video Converter Pro 2
In order to finish this guide, please install the Moyea program of FLV conversion
Once Moyea FLV to Video Converter Pro 2 is installed, launch the converter program.
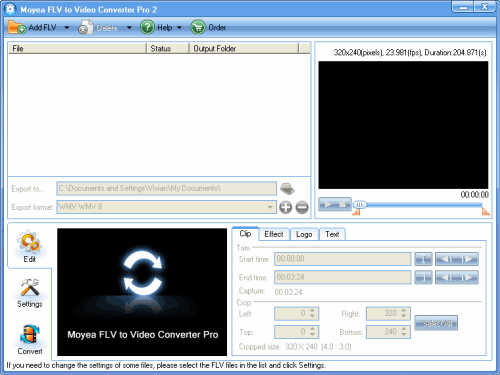
Add FLV
Click on “Add FLV” on the tool bar to import your target FLV files into the program.
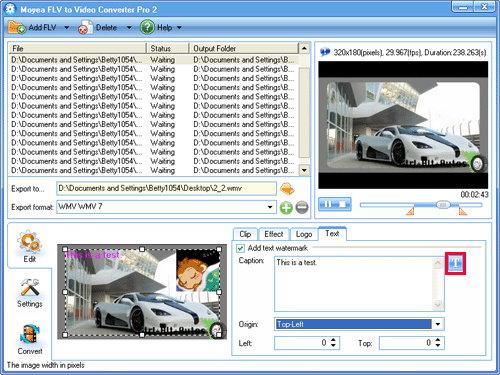
Edit
In the edit section, you are available to crop, trim, adjust effects, and add image and text watermarks.
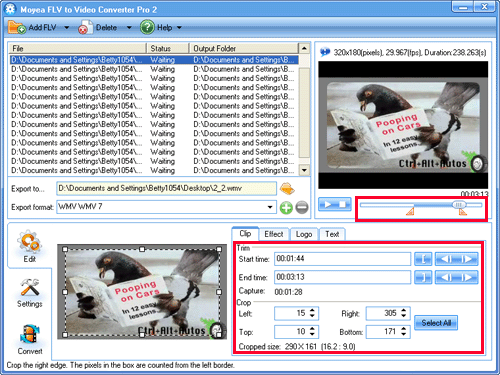
Trim: You can either trim the video by dragging the slide bar under the right preview pane, or reset the “Start time” and “End time”.
Crop: To crop the video, you can drag the dot frame or change the value in the dimension boxes.
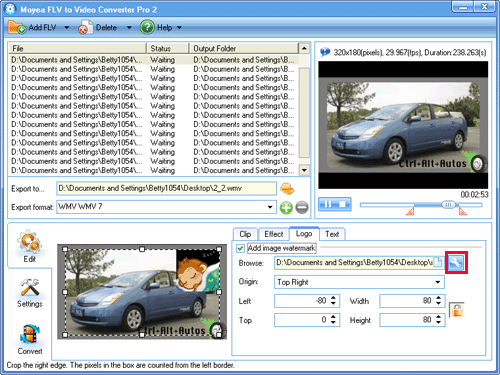
Logo: Under this tab, you can add image watermark. Check “Add an image watermark” and input the image with Browse. By clicking the button right behind Browse box, you can set the transparent color for the watermark.
Text: To add text watermark, just check “Add text watermark” and type in whatever you like in Caption box. And then you can adjust the font by clicking “T“.
Output Settings
In the pull-down menu of “Export format“, choose “WMV“, and choose the proper format for your output file: WMV WMV 7, WMV WMV 8, or WMV WMV 9.
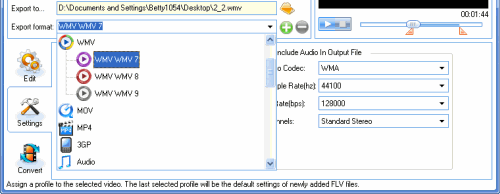
Once you have set WMV as the output format, you can change the video and audio settings for the output file in Settings section, including the codec, frame rate, bit rate, audio channel, etc.
Then you can set the Frame size as 320*240.
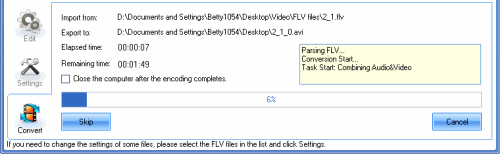
Select the output directory and convert
When all the parameters are set, you can select a convenient output folder for you file in “Export to…” and then click “Convert” and “Start“.
Tips
- Best MOV to Galaxy S Converter - Play QuickTime movies on Samsung Galaxy S
- MKV to PS3 - Play/Enjoy MKV movies on PlayStation 3
- FLV to BlackBerry PlayBook - Play FLV file on BlackBerry (BlackBerry PlayBook)
- How to rip Youtube Video FLV to mp3 for Playback on Zen Neeon 2 MP3 player?
- Best Solution to Free Download YouTube Videos
- How to Convert FLV to WMV for Sony Vegas?
- Best Veoh Video Downloader - Download and convert Veoh online videos to iPad
- Free Flash Video Downloader - Free download videos from Google
- Convert Flash Video FLV from YouTube to 3GPP for Sony Ericsson
- How to play flv online?