As is stated in Introduction on Virtual Host, Flash Video Server is a C/S based video streaming platform. Client-side developers can create consoles for video playing, video publish, and live video delivering. This tutorial is to tell you how to create a FLV Player for Flash Video Server.
Tools: Macromedia Flash 8, Flash Video Server.
Notes: Readers who plan to follow this guide shall be with some basic knowledge of using Flash 8 and Action Script.
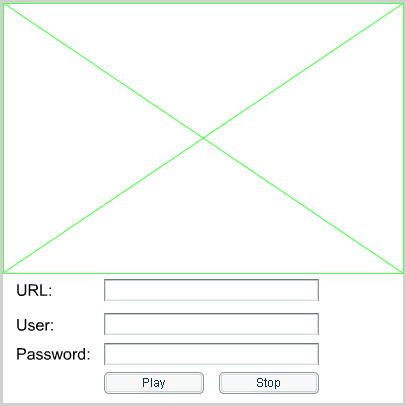
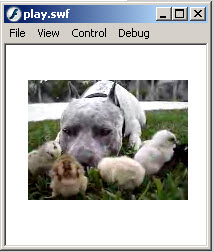
Output: The picture below shows the output Player for Flash Video Server. End users can enter the desired URL, their user name, password, and play the FLV on the Server.
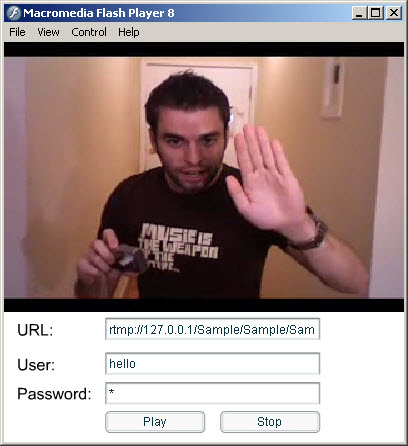
Let’s see what we have on the Player. We need an area for video streaming, some text boxes for inserting information, and some buttons to control the video. Once the authorized end user entered the right URL, user name, and password, and click Play, the video will start to play in the video screen. Click Stop, the video will stop at the very beginning.
Steps:
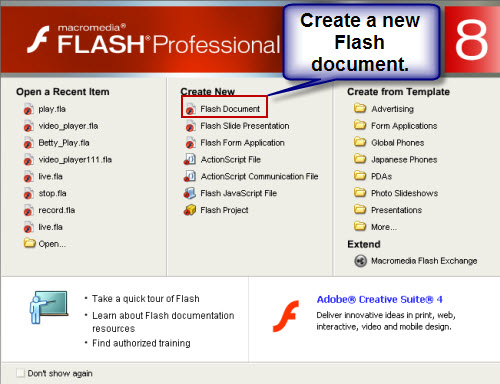
- 1. Launch Macromedia Flash 8 and create a new Flash document.
And then we can create and place the relative contents on this Flash document.
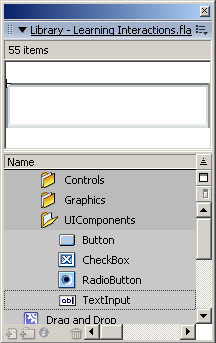
Video screen: Press Ctrl+L, the Library window will pop up. Right click in the blank of Name & Type section and select “New Video…”. Name it in Symbol box and select Video (ActionScript-controlled). Press OK to confirm.
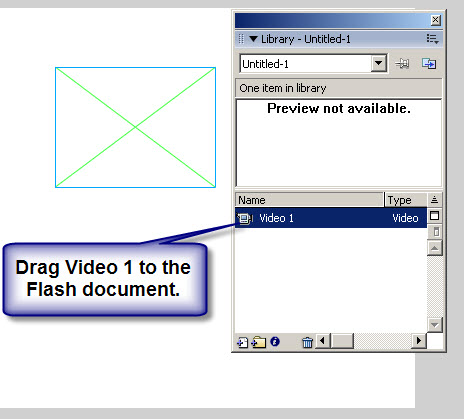 Drag it to the Flash document and you can modify the size and position. You can click it and set its Properties by expanding the menu at bottom.
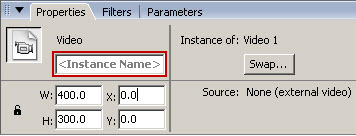 Here we set the Width as 400 and Height as 300. Then you must name this video screen in “Instance Name” box as marked in the above picture. Here we name it as “video_screen”.
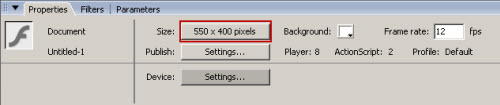
By clicking the blank area on the document and expand Properties, you can set the size of the Flash document. Here we click the red-marked button and set the dimension as 400*400 pixels.
Here we set the Width as 400 and Height as 300. Then you must name this video screen in “Instance Name” box as marked in the above picture. Here we name it as “video_screen”.
By clicking the blank area on the document and expand Properties, you can set the size of the Flash document. Here we click the red-marked button and set the dimension as 400*400 pixels.
 Text objects
By clicking the "A" button on Tools window, we can add text on the document. Just drag an area and insert "URL:", and then, choose Window/ Common Libraries/ Learning Interactions. In the pop up window we can drag the TextInput button to the document. This is the box we insert URL. Repeat the upper steps to add "User:" and "Password" text boxes.
Text objects
By clicking the "A" button on Tools window, we can add text on the document. Just drag an area and insert "URL:", and then, choose Window/ Common Libraries/ Learning Interactions. In the pop up window we can drag the TextInput button to the document. This is the box we insert URL. Repeat the upper steps to add "User:" and "Password" text boxes.
 Align and modify them as follows.
 Name the objects:
Select the relative TextInput box, and select Properties to insert the right instance name.
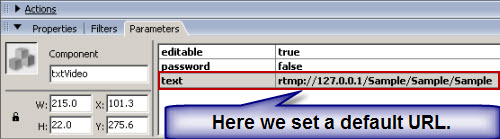
URL TextInput box: txtVideo
User TextInput box: txtUser
Password TextInput box: txtPassword
And then set the relative parameters. Same with the upper step, you must select the right object and set:
URL TextInput box:
Name the objects:
Select the relative TextInput box, and select Properties to insert the right instance name.
URL TextInput box: txtVideo
User TextInput box: txtUser
Password TextInput box: txtPassword
And then set the relative parameters. Same with the upper step, you must select the right object and set:
URL TextInput box:
 User TextInput box:
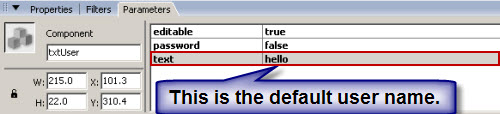 Here you can leave it empty.
Password TextInput box:
Here you can leave it empty.
Password TextInput box:
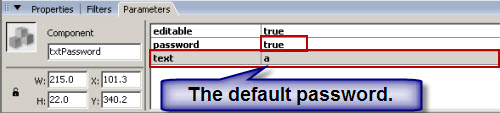
This text box can be empty.
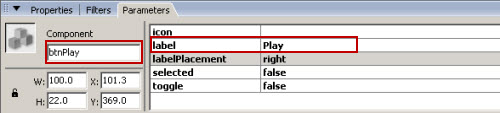
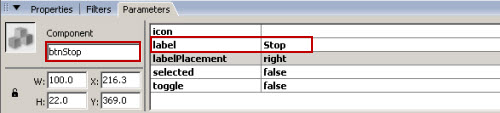
Buttons:
Please follow the settings in the following pictures. The red-marked boxes show the required changes.
Play button:
 Stop button:
 After the layout step, we must write some codes to control these objects. There are two sections: codes for the blanks, and codes for buttons.
Initialization codes:
Click on the blank area of the Flash document and expand Actions-Frame. Copy and paste the following codes:
var nc: NetConnection = new NetConnection();
var ns:NetStream;
var videoLoaded = false;
Codes for the buttons:
Click on the Play button and expand Actions-Frame. Copy and paste the following codes:
on(click)
{
var nc = _parent.nc;
var ns = _parent.ns;
if (!_parent.videoLoaded || _parent.videoFile != _parent.txtVideo.text) {
var url;
var file;
var full_url = _parent.txtVideo.text;
var index = full_url.lastIndexOf("/");
if (index == -1) return;
url = full_url.substr(0, index);
file = full_url.substr(index+1);
nc.connect(url, _parent.txtUser.text, _parent.txtPassword.text);
_parent.ns = new NetStream(nc);
ns = _parent.ns;
_parent.video_screen.attachVideo(ns);
ns.play(file);
ns.pause(true);
_parent.videoLoaded = true;
_parent.videoFile = _parent.txtVideo.text;
}
ns.pause();
}
Have you noticed the red part of the codes? It means the user name and password. This is a unique feature of Flash Video Server, with which end users can access the virtual host with the user name and password. If the user is authorized, he can access the virtual host and play the desired FLV. To know more about user authorization, please refer to Moyea Flash Video Server Console Manual. For the FLV Player we are creating now, a guest can not play the video without an ID and authorization.
Click on the Stop button and expand Actions-Frame. Copy and paste the following codes:
on(press)
{
_parent.ns.seek(0);
_parent.ns.pause(true);
}
4. Export
After all the above settings, we can check by pressing Ctrl + Enter. If it works, we can export it as an SWF.
Select File> Export> Export Movie…
Choose the desired location, name the file and press OK.
In the Export Flash Player window, select “Access network only” in the Local Playback Security menu.
Press OK to confirm and now we finish it.
You can play the URL with your own user name now. You can click the following link to download this FLV Player, and .fla file.
/img/flashserver/FVS_FLV_player.swf
/img/flashserver/FVS_FLV_player.fla
A Simple FLV Player for Flash Video Server
As is stated above, this player only allows registered and authorized users to play videos on the virtual host. Can other users play videos on the Flash Video Server? Of course they can. The following codes will help you create a simply player with which any user can access to play.
Just add a video screen in the Flash document, and add the following codes.
Initialization codes:
var nc: NetConnection = new NetConnection();
nc.connect("rtmp://127.0.0.1/Sample/Sample");
var ns: NetStream = new NetStream(nc);
video_screen.attachVideo(ns);
ns.play("sample");
You can change the red parts with your own application URL and video name. As long as there is no power specified, any user can play sample.flv.
After the layout step, we must write some codes to control these objects. There are two sections: codes for the blanks, and codes for buttons.
Initialization codes:
Click on the blank area of the Flash document and expand Actions-Frame. Copy and paste the following codes:
var nc: NetConnection = new NetConnection();
var ns:NetStream;
var videoLoaded = false;
Codes for the buttons:
Click on the Play button and expand Actions-Frame. Copy and paste the following codes:
on(click)
{
var nc = _parent.nc;
var ns = _parent.ns;
if (!_parent.videoLoaded || _parent.videoFile != _parent.txtVideo.text) {
var url;
var file;
var full_url = _parent.txtVideo.text;
var index = full_url.lastIndexOf("/");
if (index == -1) return;
url = full_url.substr(0, index);
file = full_url.substr(index+1);
nc.connect(url, _parent.txtUser.text, _parent.txtPassword.text);
_parent.ns = new NetStream(nc);
ns = _parent.ns;
_parent.video_screen.attachVideo(ns);
ns.play(file);
ns.pause(true);
_parent.videoLoaded = true;
_parent.videoFile = _parent.txtVideo.text;
}
ns.pause();
}
Have you noticed the red part of the codes? It means the user name and password. This is a unique feature of Flash Video Server, with which end users can access the virtual host with the user name and password. If the user is authorized, he can access the virtual host and play the desired FLV. To know more about user authorization, please refer to Moyea Flash Video Server Console Manual. For the FLV Player we are creating now, a guest can not play the video without an ID and authorization.
Click on the Stop button and expand Actions-Frame. Copy and paste the following codes:
on(press)
{
_parent.ns.seek(0);
_parent.ns.pause(true);
}
4. Export
After all the above settings, we can check by pressing Ctrl + Enter. If it works, we can export it as an SWF.
Select File> Export> Export Movie…
Choose the desired location, name the file and press OK.
In the Export Flash Player window, select “Access network only” in the Local Playback Security menu.
Press OK to confirm and now we finish it.
You can play the URL with your own user name now. You can click the following link to download this FLV Player, and .fla file.
/img/flashserver/FVS_FLV_player.swf
/img/flashserver/FVS_FLV_player.fla
A Simple FLV Player for Flash Video Server
As is stated above, this player only allows registered and authorized users to play videos on the virtual host. Can other users play videos on the Flash Video Server? Of course they can. The following codes will help you create a simply player with which any user can access to play.
Just add a video screen in the Flash document, and add the following codes.
Initialization codes:
var nc: NetConnection = new NetConnection();
nc.connect("rtmp://127.0.0.1/Sample/Sample");
var ns: NetStream = new NetStream(nc);
video_screen.attachVideo(ns);
ns.play("sample");
You can change the red parts with your own application URL and video name. As long as there is no power specified, any user can play sample.flv.
 Promotion


 How to make a Client-side FLV Player for Flash Video ...
